Garbage disposal installation is a task sought by many homeowners looking to combine functionality with environmental responsibility. Are you considering replacing your old unit or installing a fresh one? This guide will tell you exactly how.
Garbage disposals are machines that;
- Grind the kitchen waste and flush it down the drain.
- They are eco-friendly
- Keeping leftover food out of your trash
- Eliminating pesky odors.
Installing the garbage disposal seems like a difficult task, but with the correct tools and knowledge provided by Disposal Smartly, you can equip this installation.
Table of Contents
Facts to know before installation
Garbage disposals come in a variety of sizes and horsepower levels. To choose the right one following facts must be known to the user:
- Size of your household
- The amount of daily usage
- Type of food waste you dispose of.
Which essential tools are needed for Disposal Installation?
Keeping in mind, the right tools can make the process smoother and more efficient. They also can save you time and potential hassle. These necessary tools are;
Screwdriver
It is a tool needed to disconnect the old unit. And assembling or installing your new garbage disposal. The screwdriver must fit the screws of your disposal unit. Both slot and Phillips-head are necessary.
Plumber’s Wrench
This tool is designed to get a good grip on pipes and fittings that are impossible to turn with a hand. It is perfect for loosening or tightening the connections during your installation.
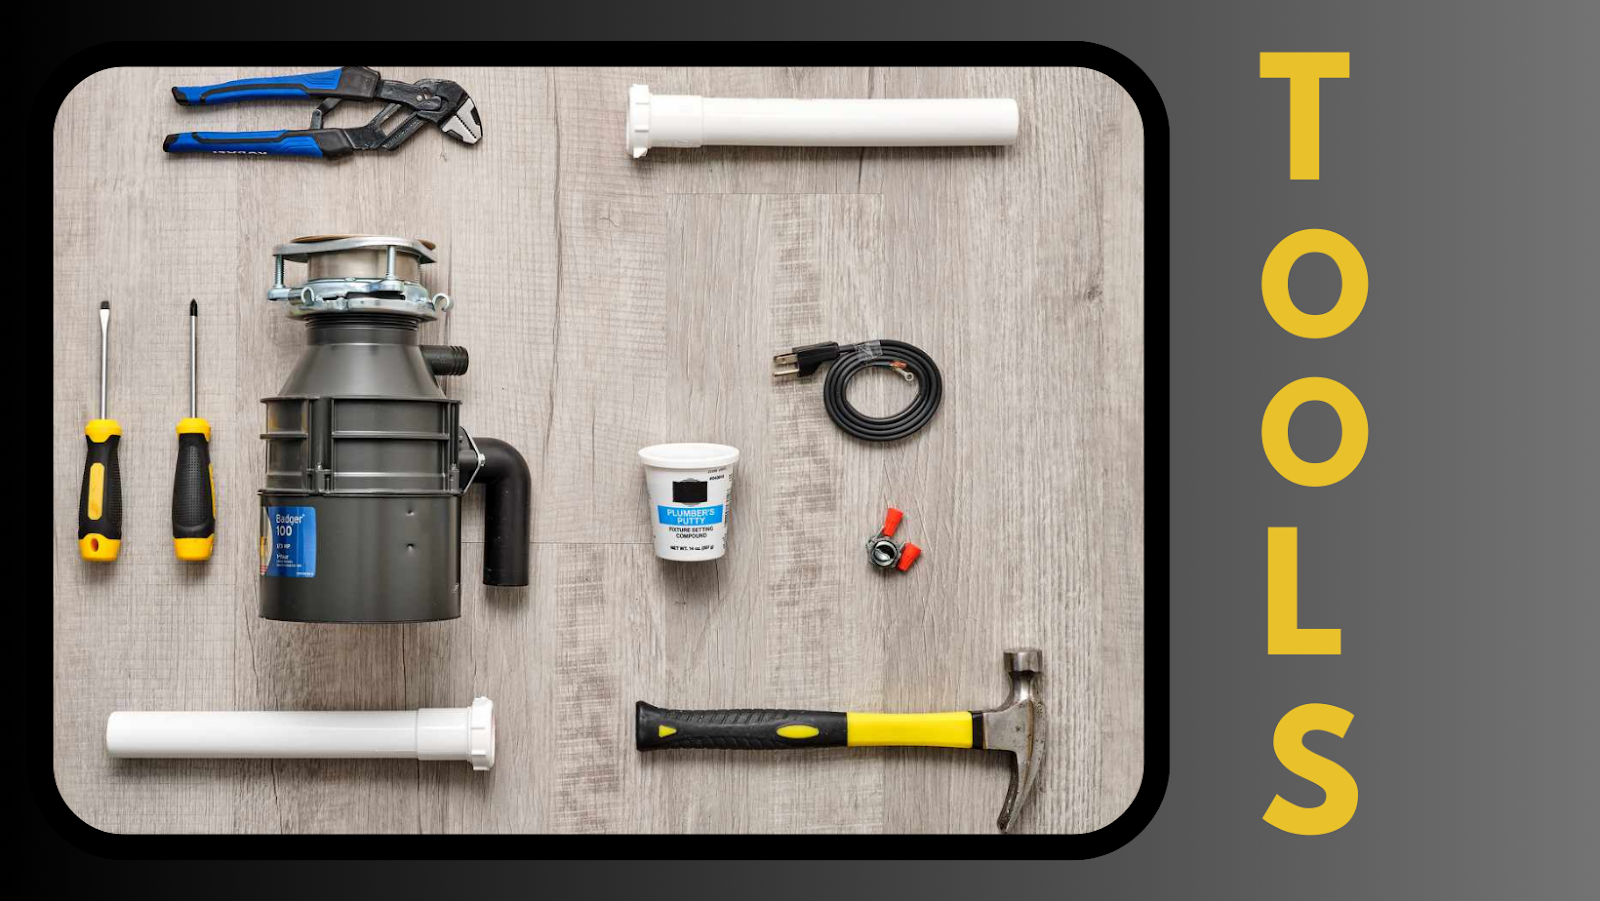
A plumber’s putty
It is also necessary for sealing the flange. This will create a watertight seal and prevent leaks. A packet of putty can be used for several uses, so you can store the rest for future projects.
Bucket
While it may not look like a traditional tool. But it is a crucial tool for your disposal installation. It can be helpful to throw out any water or debris that leaks when you disconnect the old unit. It helps to keep your workspace clean and prevent potential water damage.
What is role of Plumbing in Garbage Disposal Installation?
Routing the reality of plumbing might seem a bit overwhelming – especially when it involves installing a garbage disposal system. But, here is a friendly tip: it is not as complicated as it seems. We are going to help you realize the hints involved in installation.
Plumbing plays a vital role in garbage disposal installation. Your sink’s plumbing system is the key channel that transfers waste from the garbage disposal unit to your home’s larger plumbing system. It functions as the pillar of your garbage disposal’s functionality. In simple terms, managing a smooth link between your plumbing and the new disposal system is quite fundamental.
What should be ensured?
Ensuring you have the right trap adapters, connectors, and waste outlet pipes is key when it comes to espousing your garbage disposal to your plumbing system. Remember, leak-free is the way to be! Misalignments or loose connections can lead to leakages and potential pipe damage.
Pre-Installation Checks: What to Look For
Before taking the responsibility to install a new garbage disposal, it is fundamental that you are fully aware of;
- What pre-installation checks are necessary?
- What you are looking for might surprise you?
So, take a step back, ensure that your toolbox is within reach, and review the points below:
- Establish Your Sink’s Compatibility
- Inspect Electrical Wiring
- Have a Plan for Dealing with Waste Water
- Permits, Regulations, and Compliance
- Check Your Installation Tools
Prepping Your Sink: Initial Steps for Garbage Disposal Installation
The journey to garbage disposal installation all surprises with proper preparation. Now, it’s time to get hands-on and prepare your sink for the installation.
Here’s how to dominate the pre-installation process;
- Disconnect Plumbing
- Remove the Old Sink Flange
- Clean and Prep the Area
- Install the New Sink Flange
Your sink is now prepped and ready for garbage disposal installation.
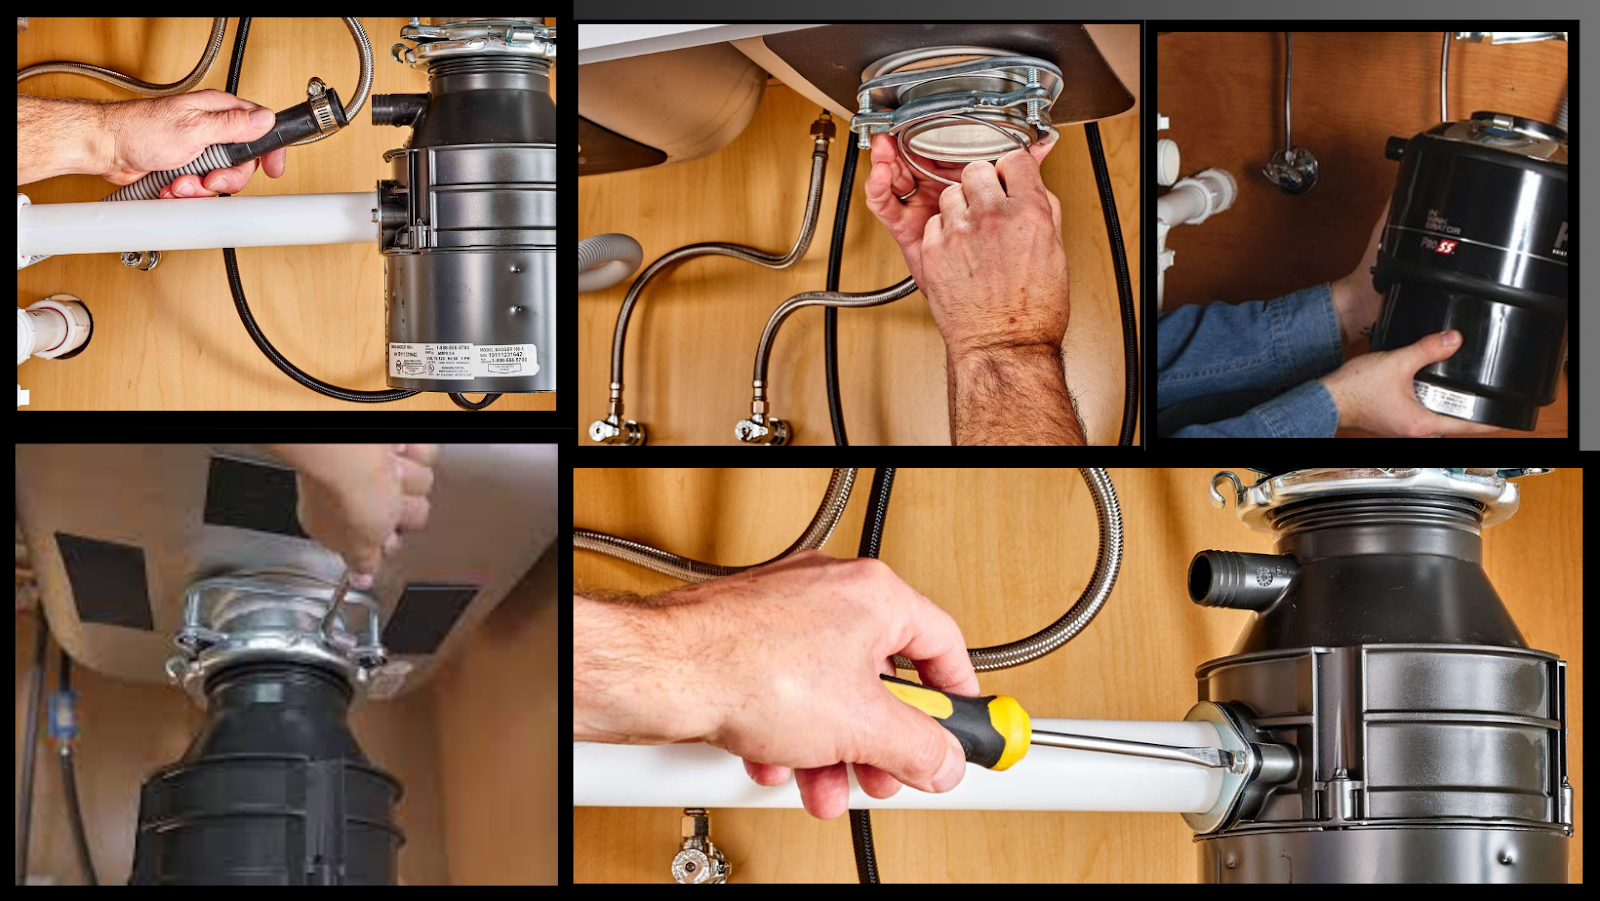
A Step-by-Step Guide to Installation
Installing your garbage disposal unit is not as discouraging as it sounds. Follow the step-by-step guide to install the garbage disposal:
Step 1: Position the Mounting Ring
Begin with the mounting ring. This is a key component that holds your disposal unit. Slide the ring onto the sink flange until it comes apart securely into the channel. Ensure that everything is tight enough to hold the garbage disposal unit.
Step 2: Connect the Drain
Follow this by concentrating on connecting the drain. Attach your garbage disposal’s drain to the sink’s waste pipe. Use the provided gaskets or plumber’s putty to ensure a waterproof seal. Remember, any leaks will make your unit unproductive and cause potential water damage.
Step 3: Install the Garbage Disposal Unit
It is now time for the main step, installing the garbage disposal unit. Ensuring that the inner parts of the disposal unit align with the mounting ring, push it up towards the sink flange. Rotate it until it is fixed firmly into place.
Step 4: Double Check All Connections
Your last step should always be verifying all connections. Make certain that your disposal is deskbound securely, your drain is sealed tightly, and your plumbing is appropriately reconnected. Intentionally check each step because a loose screw could lead to a much larger problem like leaking.
Step 5: Electrical Connections: Directing the Mess of Wires
Once the power is disconnected, now it is time for installation. Locate the wires on your garbage disposal unit.
You will generally find a green wire (ground), a white wire (neutral), and a black wire (earth).
- The green wire attaches to the green ground screw inside your disposal unit confirming possibly harmful electrical current has a path to earth in the incident of a fault.
- Attach the white wire from the garbage disposal to the white wire from the power supply using a wire nut. This is your neutral connection.
- Repeat the process for the black wires.
This establishes the flow of electricity. Your disposal unit is now electrically connected.
Step 6: Confirming Proper Drain Connection
A drain connection is indeed a crucial part of setting up your garbage disposal. This part will significantly influence your garbage disposal unit’s performance and longevity. Ensure your eagerness for this DIY project does not overlook the attention to detail necessary in lock-up drain connections.
Make ensure the following checks properly:
- Aligning the discharge tube with the drain trap
- Installing a drain pipe and a dishwasher drain connection
- Ensuring your drain pipe diameter is in sync with your garbage disposal unit
- Watch out for drips and seepage once you power on the unit.
Conclusion
Installing a garbage disposal might look overwhelming. But with the right tools, some careful preparation, and a step-by-step approach, it is a task that you can confidently tackle. Remember, ensuring your sink compatibility, getting your plumbing and electrical wiring ready, and making sure all regulations are complied with, customs an important parts of the process. Then, the installation itself— from preparing your sink, and mounting your disposal unit, to making the correct wire and drain connections, we have covered it all. Happy installing!
Can I install a garbage disposal myself, or do I need to hire a professional plumber?
Installing a garbage disposal can be tricky and may require special tools. It’s best to have a professional plumber do it to avoid mistakes and ensure it’s done safely. They can also check if your kitchen is set up for disposal. It’s always smart to ask for help with this job.
What safety precautions should I take during garbage disposal installation?
When installing a garbage disposal, always turn off the power and follow the instructions carefully. Avoid putting your hands inside the disposal and use tools with caution. If you’re unsure, ask an adult for help. Safety first!
Can improper installation can cause damages?
Yes, improper installation of a garbage disposal can cause damage. If it’s not installed correctly, it may leak water or cause electrical problems. This can lead to costly repairs and potential hazards. It’s important to follow the instructions carefully or ask for help to avoid these issues.
How do I troubleshoot common issues with my garbage disposal after installation?
If your garbage disposal is acting up, first make sure it’s turned off. Then, check for any stuck items and use a hex key to manually turn the disposal. If it’s still not working, press the reset button under the unit. If problems persist, it’s best to ask a professional for help.